
Pixel Art guide
Minecraft Pixel Art Grid: A Practical Block-by-Block Building Guide
Learn how a Minecraft pixel art grid helps you read block positions, check proportions, follow rows, and turn a converted design into a practical build plan.
Minecraft Image Tools Team ·
A Minecraft pixel art grid turns a finished design into something you can follow block by block. Instead of judging the artwork only as an image, the grid separates it into visible cells so you can see exactly where one block ends and the next begins.
That is especially useful for outlines, faces, lettering, logos, and other details where being one block off can change the whole shape. A clean preview shows what the artwork should look like. The grid helps you reproduce it accurately in Minecraft.
What a Minecraft Pixel Art Grid Actually Does
For a flat pixel-art build, each generated design cell represents one block position. The grid does not add detail or change the palette. It makes the existing block layout easier to read.
This matters because the source image and the Minecraft build do not share the same resolution. A source photo might be thousands of pixels wide, while the converted design may be only a few dozen blocks wide. The conversion determines the final layout; the grid exposes that layout as individual cells.
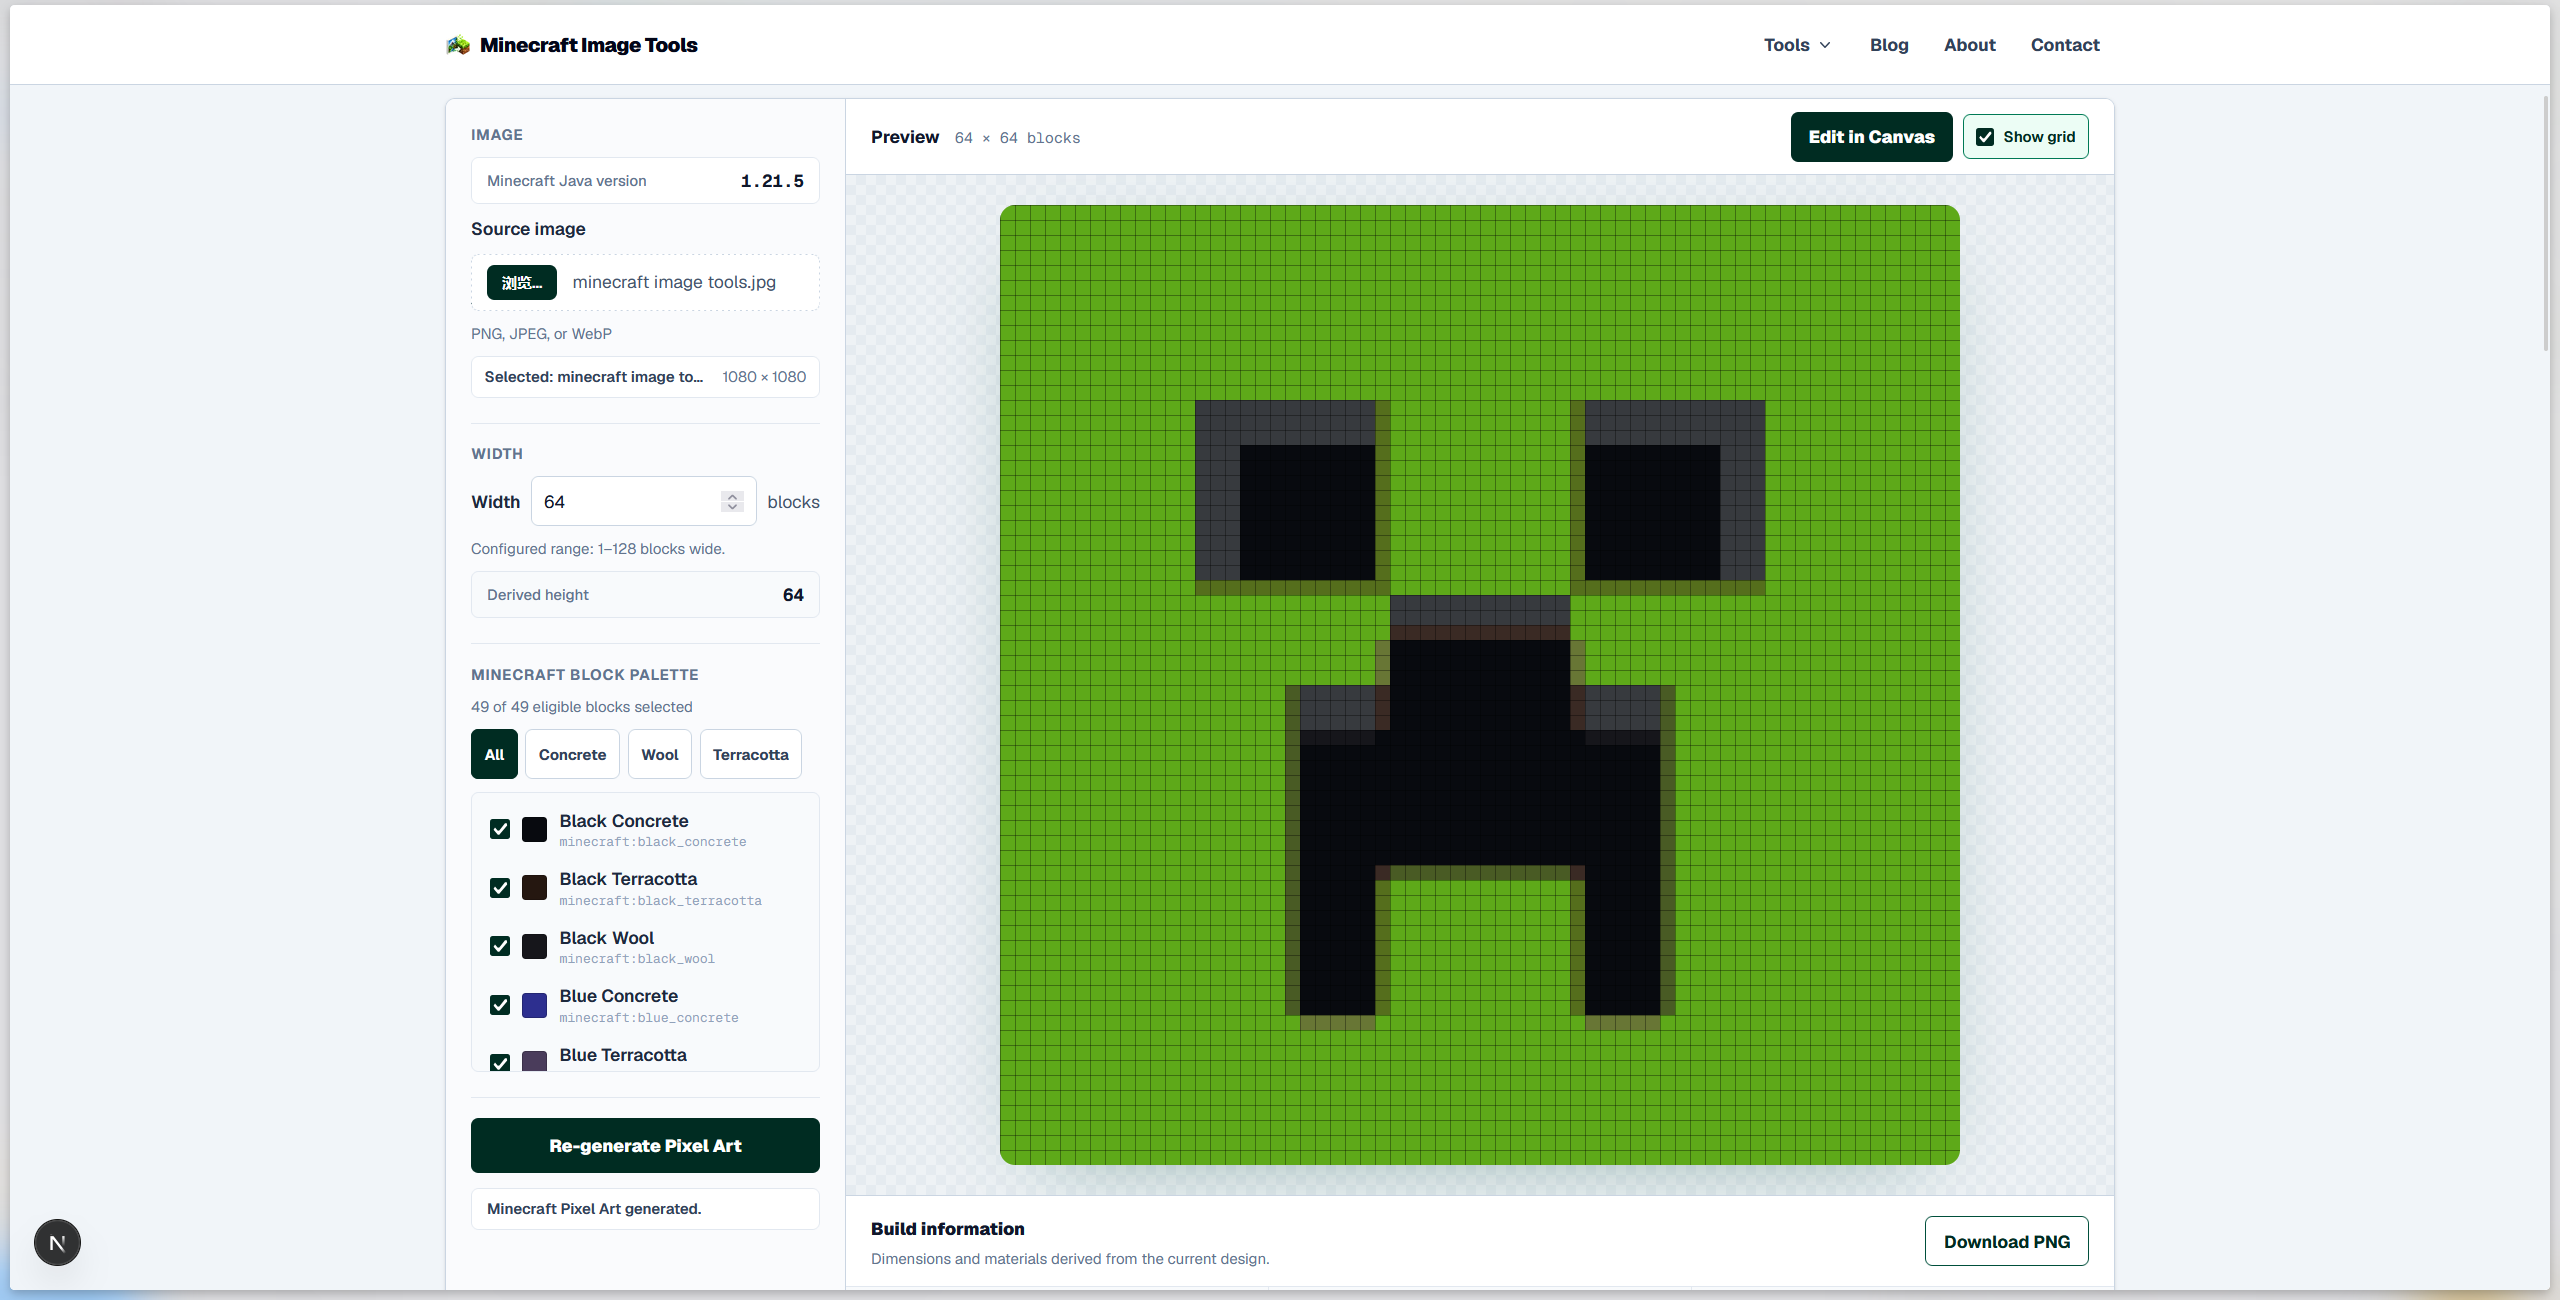
In the current Minecraft Image Tools workflow, Preview includes a Show grid control. The Canvas also has a Grid view while you edit individual cells. These are viewing aids: turning the grid on or off does not change the block design itself.
This guide covers a variable-size block grid for wall, floor, sign, and mural builds. If you want one fixed 128 × 128 in-game map instead, use the Minecraft Map Art Generator; its map-specific colors and block choices are different from the Pixel Art grid described here.
How to Use a Minecraft Pixel Art Grid While Building
The simplest approach is to use the grid as a fixed placement reference from the first block to the last.
1. Generate the design at a practical size
Open the Minecraft Pixel Art Generator, upload the source image, choose a Width, select the blocks you want to allow, and generate the design.
The current tool accepts Widths from 1 to 128 blocks, while Height follows the source image's aspect ratio. You do not need the largest possible design. Start with a size that keeps the subject recognizable and still fits the space you plan to build in.
For a deeper size comparison, use the Minecraft Pixel Art Size Guide.
2. Turn on the grid before you start counting
Enable Show grid in Preview and look at the entire design before placing blocks. Confirm the Width, Height, outer edges, and orientation.
Then choose one corner of the artwork as your starting point in Minecraft. Bottom-left and top-left both work; consistency matters more than the specific corner.
3. Build in short rows or sections
For a small design, you can follow one row at a time. For a larger wall, divide the artwork into manageable rectangular sections.
Keep the same reference direction as you work. If you switch direction without checking orientation, it is easy to mirror a row or shift the next section by one block.
4. Add checkpoints so you do not recount everything
Long rows are where small mistakes become expensive. Use temporary visual checkpoints while building. For example, mark every 8 or 16 blocks with a contrasting temporary block, or divide the design into repeated sections you can verify separately.
The interval is not important. The goal is to shorten the distance you need to recount when something looks wrong.
5. Check materials before committing to a large area
The grid tells you where blocks go. Build Information tells you what the design uses.
Review the dimensions, total blocks, distinct materials, and per-material quantities before starting a large section. If the block list is impractical, it is better to adjust the design before you have already placed hundreds of blocks.
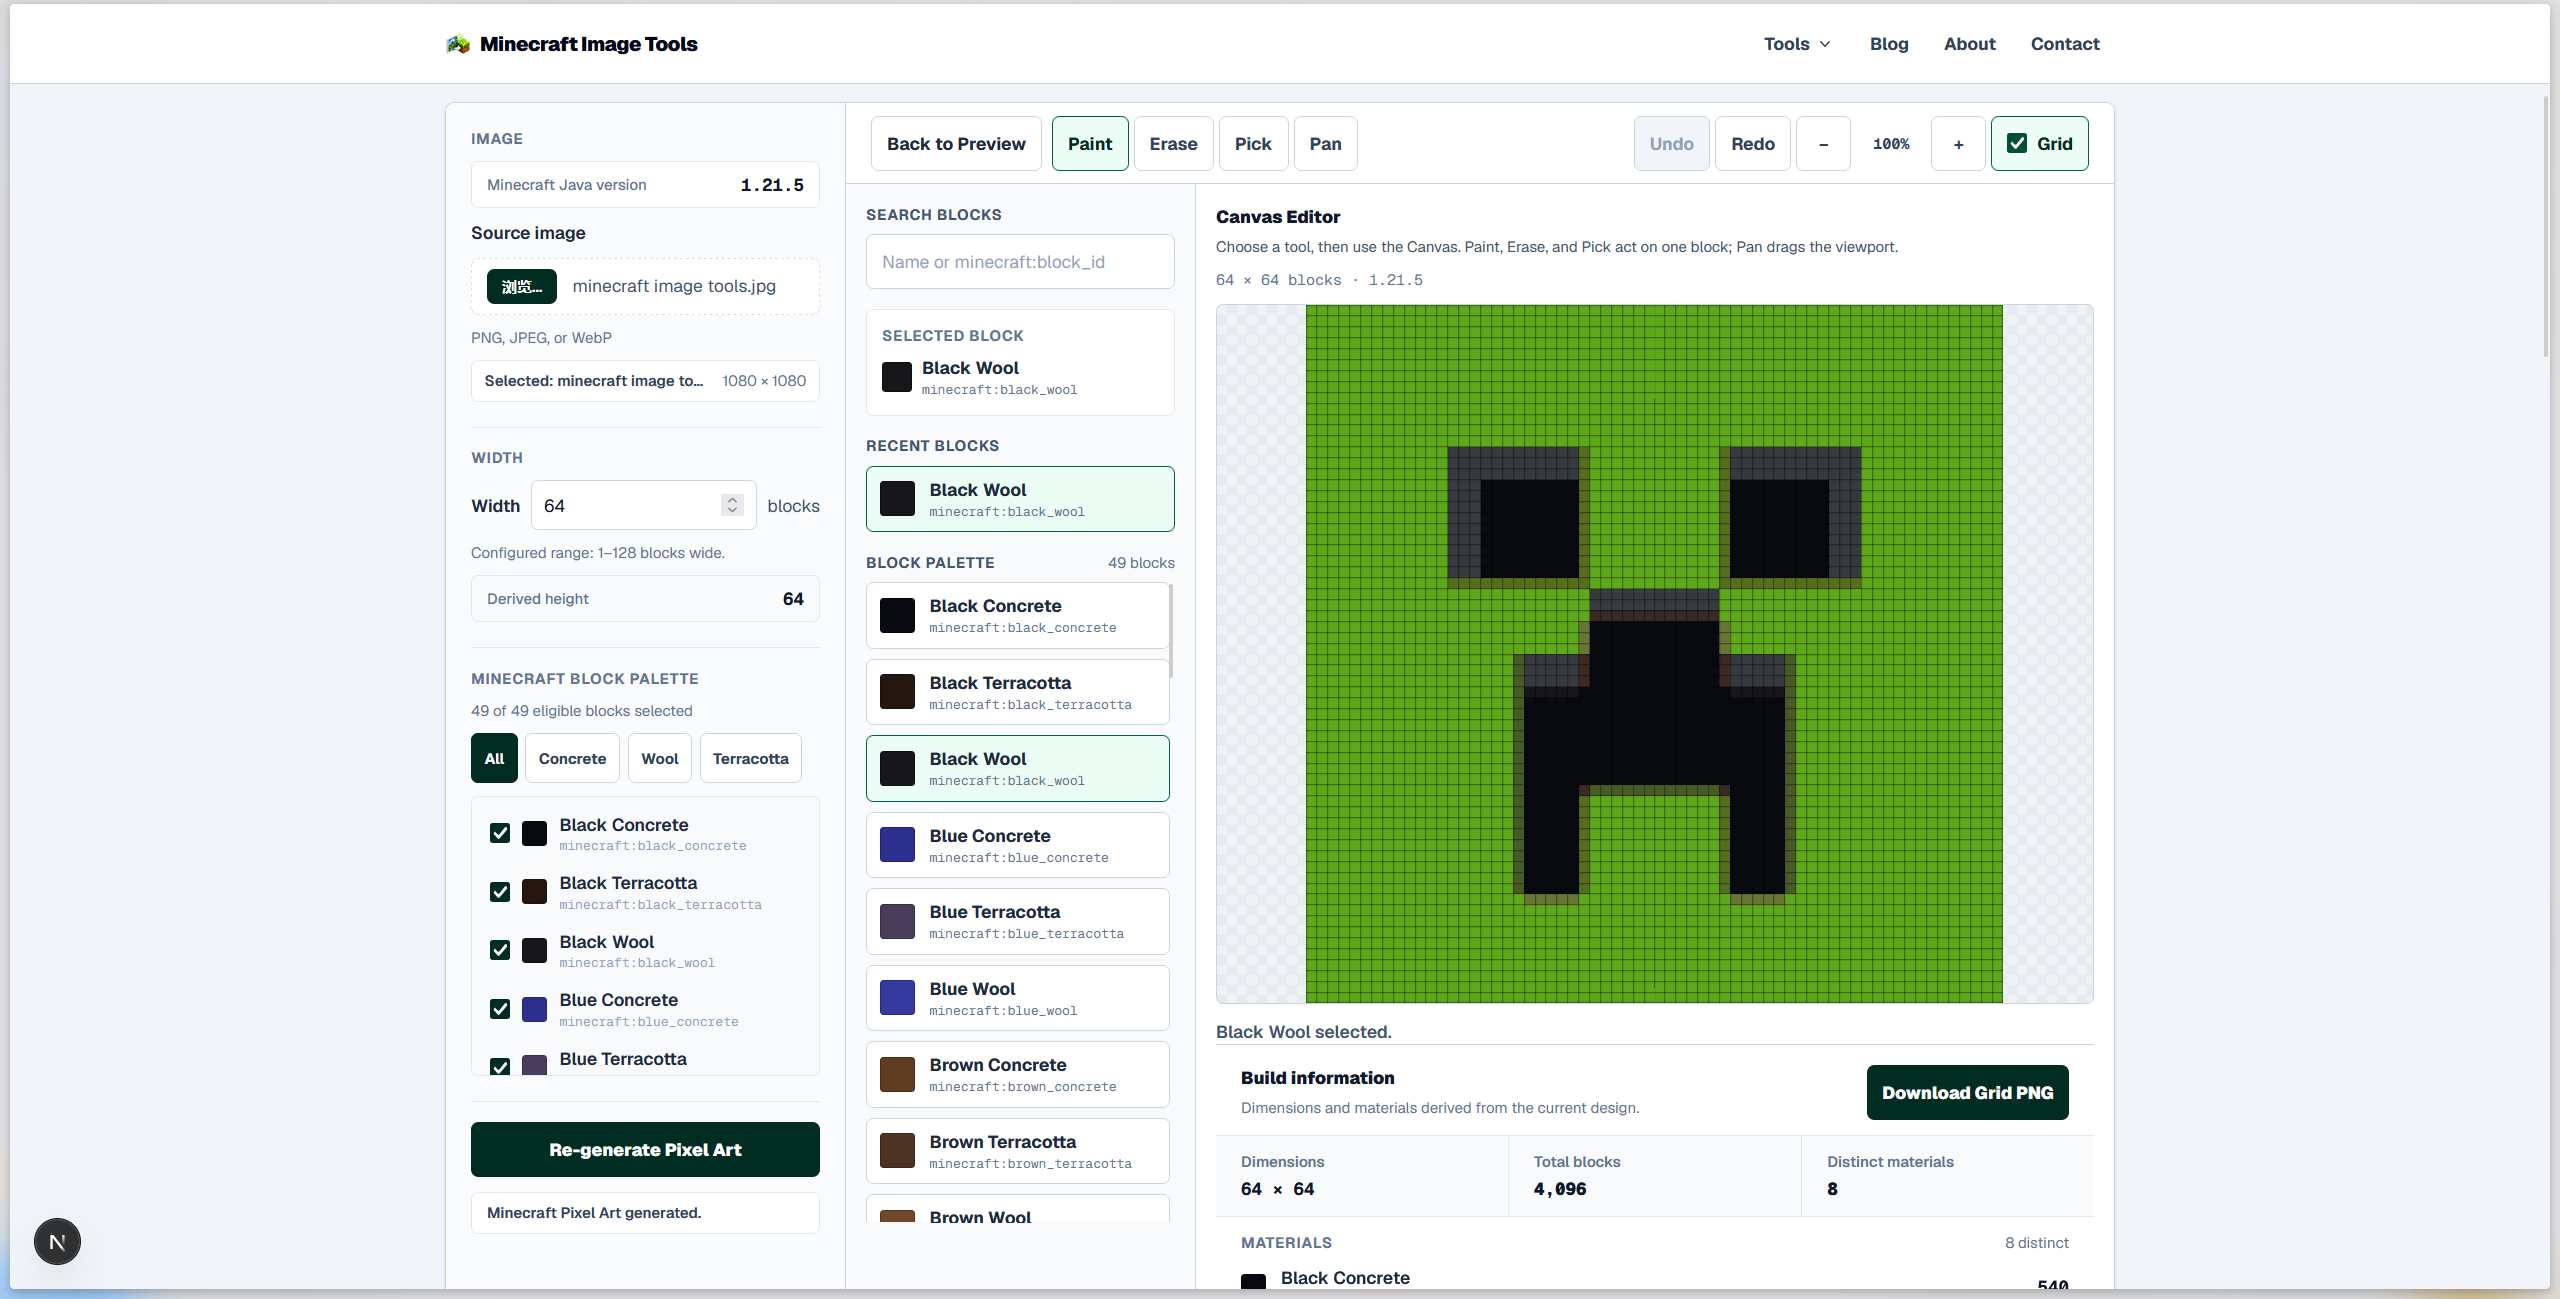
6. Correct important cells in the Canvas
If the grid reveals a rough outline, broken letter, isolated cell, or awkward color transition, fix it before reproducing the problem in-game.
The Canvas lets you Paint or Erase cells, Pick a block already used in the design, search the palette, and Undo or Redo edits. Keep the Grid visible while making corrections so the changed position remains clear.
How to Read the Grid Without Losing Your Place
A reliable building rhythm is more useful than trying to move quickly. One missed block can shift everything that follows.
A simple routine works well:
- Start from the same side of each row.
- Count a short run of identical blocks.
- Place that run in Minecraft.
- Check the next color change against the grid.
- Stop at a checkpoint and compare the completed area with the full design.
Use recognizable parts of the picture as landmarks. Corners, eyes, letters, strong outlines, and large color regions are easier to verify than a long run of similar blocks. If a landmark appears one cell too early or too late, check the current row before continuing.
Grid Size Changes Detail and Build Effort
A larger grid gives the design more cells for small shapes and edges, but it also creates a larger build.
For the same source proportions, increasing Width also increases Height. If both dimensions roughly double, the total grid area becomes roughly four times larger. More detail therefore comes with more placement work and usually more materials.
Choose the smallest grid that still preserves the features you care about. If the important shapes already read clearly, increasing the grid further may not justify the extra scale.
Use the Minecraft Pixel Art Grid to Catch Problems Early
Cell boundaries often reveal issues that look harmless in a clean preview.
Check for isolated blocks, one-cell gaps, inconsistent line thickness, jagged lettering, and color changes that will be difficult to follow while building. Do not automatically remove every stepped edge—pixel art naturally uses them. The question is whether the placement still communicates the intended shape.
Switch between the clean preview and the grid view. The clean view answers, “Does the artwork read correctly?” The grid answers, “Can I reproduce this layout without guessing?”
This is also why editing is best done before construction. Fixing one cell in the Canvas takes seconds. Fixing the same error after it has shifted several rows of a large wall can take much longer.
Using the On-Screen Grid With the PNG Download
The current grid should be treated as an on-screen building aid.
Use Show grid in Preview when you need visible cell boundaries. The regular PNG download is useful as a clean visual reference, while the live grid is better when you need to count exact positions.
If possible, keep the grid open on a second monitor, tablet, or another browser window while you build. Zoom to a level where individual cells are easy to distinguish without losing the overall shape.
Common Mistakes to Avoid
Treating the original image pixels as Minecraft blocks. The generated design defines the final block layout, not the source image resolution.
Starting before checking the whole design. A perfectly followed grid cannot fix poor proportions or an unreadable conversion.
Changing orientation between rows. Pick a starting side and keep it consistent so rows are not accidentally mirrored.
Changing the palette after construction begins. Re-generating with different blocks can change cell colors. Finalize the design and Material List first.
Waiting for a mistake before using the grid. The grid works best as a planning tool from the first row, not only as a troubleshooting view.
Conclusion
A Minecraft pixel art grid turns a visual design into a practical block-by-block reference. It helps you keep rows aligned, create checkpoints, catch awkward cells, and verify the layout before committing time and materials.
Generate a practical design, turn on the grid, choose a fixed starting point, and build in short sections you can verify as you go. The workflow is simple, but it removes much of the guesswork from larger Minecraft pixel-art builds.
FAQ
What is a Minecraft pixel art grid?
It is a cell-based view of a pixel-art design where each design cell represents one block position in a flat Minecraft build. The grid makes boundaries and color changes easier to follow.
Does one grid square equal one Minecraft block?
For the flat pixel-art workflow described here, yes. Each generated design cell corresponds to one block position in the finished artwork.
What grid size should I use?
Use the smallest Width that keeps the important parts of the subject recognizable. The current Minecraft Image Tools generator supports Widths from 1 to 128 blocks and derives Height from the source aspect ratio.
Can I edit blocks while viewing the grid?
Yes. The Canvas includes a Grid view while you edit individual cells, so you can correct important edges and details without losing their positions.
Can I download the grid as a separate image?
The current workflow uses the on-screen Grid as the cell-by-cell reference. You can download the regular finished PNG for a clean visual reference and keep the editor open when you need visible cell boundaries.
Try the workflow in your browser
Use the current Minecraft Pixel Art Generator with your own image, then edit the result and review its material counts as you follow this guide.
Open Minecraft Pixel Art Generator